Tag Archives: Android

Android 5.0 “Key Lime Pie” UI Concepts Hitting the Web, Give Us Very High Hopes


Android KLP

As we approach the rumored date for Android 4.3′s launch on June 20 (at least, that’s what our sources say), many have already come to the realization that we should not expect Google to introduce a new interface for the OS. It will still be called Jelly Bean and nothing too crazy will happen. What most in the business have their money on is that we can expect to see Google change up Android’s look in the iteration after next, being Android 5.0 “Key Lime Pie.” That’s when we will see some new colors, icons, wallpapers, etc. take place. 

Graphic designers appear to be already creating their very own concepts for what they would like to see in Android 5.0, playing more with lockscreen widgets and revising the Android homescreen look. Artist Jinesh Shah took to his Google+ page recently to post up a few pictures of his own ideas, some of which we have become big fans of. While it comes off as minimal and clean, there is enough information on any given homescreen and the lockscreen to give off the sense that this concept would be highly functional and practical for users.

The lockscreen widget shows a comprehensive look at this user’s upcoming meeting, even showing a map preview of its location. Below that, we can see upcoming flight details, all of which would be able to be customized under new settings that would come with KLP. As for the homescreen changes, what sets this concept apart from others is the idea of “hidden” widgets. With swipes and other gestures, you could reveal other widgets that don’t necessarily have to be on your homescreen when not being used. It’s a fantastic concept, one that we probably wouldn’t mind seeing implemented.

Android 5.0 Music WidgetAndroid 5.0 Music Widget Closed

Android 5.0 HomescreenAndroid 5.0 Lockscreen

Share your thoughts on the Android 5.0 concept below!

originally posted on: http://www.droid-life.com/2013/06/14/android-5-0-key-lime-pie-ui-concepts-hitting-the-web-give-us-very-high-hopes/

Sharing your mobile “internet” data connection – free


I will love to say a big “HAPPY NEW YEAR” to all of you that found time to stop by my blog to catch a few tips. I must say that you are the reason I do this and it gives me great pleasure to read your comments, they assure me that we are making good progress. I am just excited that I contribute in my very little way to making your “work and play” a little more fun.

Dispatch hotspot  diagram

Dispatch hotspot diagram

I don’t get to make promises but I trust this year is gonna be a lot more fun and fruitful. Hence, I am continuing from where we left off last year and I am doing this with great respect to our growing need for data (internet data to be precise).

You’ll agree with me that it is becoming more and more expensive to get good internet connections for the increasing number of gadgets ranging from smartphones-to-tablets-to-laptops and even desktops. this has paved the way for proliferation or would I say exploitation by most telephone network providers by providing countless numbers of data packages, all in the bid to cash in on customers pocket content (cash). I however have some pretty good news for y’all. Shhhhhhhhh, don’t tell anybody outside cos I am about to let out some pretty useful secrets for absolutely “FREE”.

Easily Share your mobile data connection

You can share your device’s mobile data connection with a single computer via a USB cable or via Bluetooth: USB tethering or Bluetooth tethering. You can also share your tablet’s data connection with up to eight devices at once, by turning your device into a portable Wi-Fi hotspot. (Not all carriers and tablets support these features.)

When your tablet is sharing its data connection, an icon appears in the Status bar and as an ongoing notification in the Notifications panel (see Managing notifications).

You can also obtain a network connection for your device from a computer via Bluetooth: see Obtain a network connection via Bluetooth tethering.

USB tethering is active
Bluetooth tethering is active
Portable Wi-Fi hotspot is active
Multiple tethering or hotspot connections are active

For the latest information about tethering and portable hotspots, including supported operating systems and other details, visit android.com/tether.

Share your device’s data connection via USB

Wireless Hotspot

Wireless Hotspot

If your computer is running Windows 7 or a recent distribution of some flavors of Linux (such as Ubuntu), you typically don’t need to prepare your computer for tethering. But if you’re running an earlier version of Windows or another operating system, you may need to prepare your computer to establish a network connection via USB. For the most current information about which operating systems support USB tethering and how to configure them, visit android.com/tether.

  1. Use the USB cable that came with your tablet to connect your tablet to your computer.
  2. Open the Settings application.
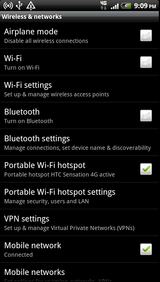
  3. Touch Wireless & networks > Tethering & portable hotspot.
  4. Check USB tethering.The tablet starts sharing its mobile network data connection with your computer, via USB connection. An ongoing notification icon is added to the System bar, to the left of the time.
  5. Uncheck USB tethering to stop sharing your data connection. Or just disconnect the USB cable.

Share your device’s data connection via Bluetooth

If your computer can obtain an Internet connection via Bluetooth, you can configure your tablet to share it’s mobile data connection with your computer.

  1. Pair your tablet with your computer.
  2. Configure your computer to obtain its network connection via Bluetooth. For more information, see your computer’s documentation.
  3. Open the Settings application.
  4. Touch Wireless & networks > Tethering & portable hotspot.
  5. Check Bluetooth tethering.

Share your device’s data connection as a portable Wi-Fi hotspot

  1. Open the Settings application.
  2. Touch Wireless & networks > Tethering & portable hotspot.
  3. Check Portable Wi-Fi hotspot.

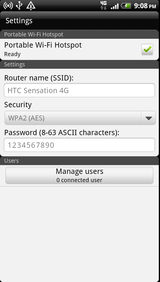
wi-fi-hotspot-sharingAfter a moment, the tablet starts broadcasting its Wi-Fi network name (SSID), so you can connect to it with up to 8 computers or other devices. An ongoing notification is added to the System bar, to the left of the time.

When Portable Wi-Fi hotspot is checked, you can change its network name or secure it. See Rename or secure your portable hotspot.

Uncheck Portable Wi-Fi hotspot to stop sharing your data connection via Wi-Fi.

Rename or secure your portable hotspot

You can change the name of your tablet’s Wi-Fi network name (SSID) and secure its Wi-Fi network.

  1. Open the Settings application.
  2. Touch Wireless & networks > Tethering & portable hotspot.
  3. Ensure Portable Wi-Fi hotspot is checked.
  4. Touch Portable Wi-Fi hotspot settings.
  5. Touch Configure Wi-Fi hotspot.

The Configure Wi-Fi hotspot dialog opens.

You can change the network SSID (name) that other computers see when scanning for Wi-Fi networks.

You can also touch the Security menu to configure the network with Wi-Fi Protected Access 2 (WPA2) security, with a preshared key (PSK).

If you touch the WPA2 PSK security option, a password field is added to the Configure Wi-Fi hotspot dialog. If you enter a password, you will need to enter that password when you connect to the tablet’s hotspot with a computer or other device. Or touch Open in the Security menu to remove security from your Wi-Fi network.

  1. Touch Save.

Voilà….Enjoy.

Adamu Fun Bala CSA; MD/CEO Lynxx Systems & Communication Technology LTD; 08035158065

[How To] Root And Flash Recovery On Galaxy Tab 2 10.1


[How to] Root Your Samsung Galaxy Tab

Being so glad owning that Samsung’s 10.1-inch “Galaxy Tab 2″ tablet PC powered with TI OMAP 4430 chipset, Dual-core 1.0GHz ARM Cortex-A9 processor, 1GB of RAM and PowerVR SGX540 GPU? Well, do not be so happy before you can liberate that high-end device (read: rooting). So far you may can’t find a one-click root tool to put your Gtab 2 10.1″ rooted.

But luckily there is a nice easy method shared by XDA senior member “Weltwon” who has been so successful achieving root on his Galaxy Tab 2 10.1 GT-P5113 model.

The method is involving Windows-based PC with ODIN v1.85 to flash custom cooked recovery and CWM Root files. That’s all and the whole process is pretty well standard for a Samsung device. Just in case if you want to repeat his action, simply read following steps.

P.S: Make sure you make a full Backup of your GTab 2 before proceeding. We hold no responsibilities of what may and may not happen.

Pre-requisite

  • Samsung Galaxy Tab
  • Windows Computer
  • Make sure you have Samsung Kies is installed but also make sure it is not running now.
  • Make sure your tablet is not connected to PC yet.

Full Steps How To Root

This method works on Galaxy Tab 2 10.1 :
– Model GT-P5113 (Tested)
– Model GT-P5100 (Tested)
– Model GT-P5110 (May work)

Step 1.
Download all necessary files first:
– Download ODIN version 1.85 (Odin3-v1.85_3.zip)
– Download needed recovery.tar.md5
– Download needed cwm-root-gtab2.zip
(GT-P5110 European model use this cwm-root-gtab2a.zip file)

Step 2.
Now copy the cwm-root-gtab2.zip (or cwm-root-gtab2a.zip) file to the ROOT of your external sdcard which is located at “/mnt/extSdCard” not in “/mnt/sdcard”.

Step 3.
Now reboot your GTab 2 into Download Mode. To do that simply turn it off and during restart push and hold down the Power + Volume UP/RIGHT buttons at the same time.

p.s: Volume Up / Right button is the side away from from the power button (not the side. closest to the POWER button).

Step 4.
On your tablet’s screen you’ll then see a blurb with yellow triangle. When it appears go ahead push Volume down button to continue into download mode.

p.s:
– Make sure you have Samsung Kies is installed but
– also make sure it is not running now.
– Make sure your tablet is not connected to PC yet.

Step 5.
Now extract the content of “Odin3-v1.85_3.zip” and you’ll have “Odin3 v1.85.exe” file. Simply double-click it to run Odin.

Step 6.
Now connect your Galaxy Tab 2 10.1″ to PC using proper USB cable.

Step 7.
Once connected >> click the PDA button on ODIN >> select the recovery.tar.md5 file >> then click the START button.

Wait for ODIN to do its job. Your GTab 2 will also reboot indicating the task’s done by ODIN.

Step 8.
Once done. Disconnect your GTab 2 from PC.

Step 9.
Now put your GTab 2 in Recovery Mode. To do that, simply turn your tablet off and restart it in recovery mode by pushing and holding the “Power” and “Volume Down” buttons at the same time. (Volume Down button is the side closest to the POWER button).

You’ll then see Samsung Tab 2 10.1 logo appears which this time you can release the power button but continue holding the volume button for a few more seconds until you see the blue CWM v5.5.0.4 text appears.

Step 10.
You should now in Recovery Mode which in this mode you can use your tablet’s Volume Up or Down to navigate through its menu and use Power button to select.

Step 11.
Now select “install zip from sdcard” >> choose the cwm-root-gtab2.zip file stored in the root of your sdcard.

Step 12.
That’s it and wait until CWM flash that rooted image file. Once done, select “Reboot system now”.

Step 13.
Once rebooted your GTab 2 should now be rooted but you better boot into CWM again and make a full Nandroid backup.

Once again, that’s it. Congratulation for your rooted Galaxy Tab 2 10.1. It means your tablet is now liberated and you can feel free to install root-only apps or even flashing custom ICS ROM on it (if any).

In case if anything got wrong, make sure you pay a visit at this XDA thread here for more further queries.

Re-blogged by: Adamu Fun Bala CSA; MD/CEO Lynxx Systems & Communication Technology LTD; 08035158065

Rooting Your Android Device – It is not mandatory


It is not mandatory
Rooting isn’t mandatory – you only need to root your device if you want to do things that require root access.
Warnings
Before you root your Android phone or tablet, there are a few things you should be aware of:
Warranty – Some manufacturers assert that rooting voids your device’s warranty. However, rooting will not actually damage your hardware. You can “unroot” your device and manufacturers won’t be able to tell if it’s been rooted.
Security – Google Wallet, in particular, has a vulnerability on rooted devices that could allow other apps to access your PIN and other wallet information.  Google Wallet displays a warning message if you run it on a rooted device. If you’re one of the few people using Google Wallet for NFC payments, you may want to reconsider rooting your device.
Bricking – Rooting a device is a very safe process. However, there’s always some danger of “bricking” a device when you go outside the normal parameters and hack around with it — particularly if you’re trying to root a device or operating system version not supported by a tool. “Bricking” refers to breaking the device, making it about as useful as a brick. When you root, jailbreak, or install a custom ROM, or otherwise hack around, you do so at your own risk. It’s a good idea to do a little bit of research first and see if other people report success rooting your device.
Setup
The actual rooting process itself should only take a single click. However, you’ll need to do a few quick things first:
Download and install the Java JDK and Android SDK on your computer before continuing. Java must be installed before the Android SDK.
Enable USB debugging on your Android. On the device, go into the Settings screen, tapApplications, tap Development, and enable the USB debugging check box.
Connect your Android to your computer using its included USB cable. Don’t mount the device’s SD card on your computer – just plug it in.
You’ll also need the USB drivers for your phone or tablet installed. SuperOneClick itself should be able to automatically install the appropriate drivers – however, if this fails, you’ll need to download and install the appropriate drivers from the device manufacturer’s website.